Global identifiers screen
This topic provides an overview of the Global identifiers screen and all the settings and buttons on it. However if you require step-by-step procedures on using Global identifiers refer to Using Global identifiers.
All users can search and filter on case identifiers and imported identifiers but only administrators, or users who have the Global identifiers manager permission selected on the Edit user screen can manage case, imported and black list identifiers.
The Global identifiers screen allows you to view all the identifiers from the cases in your OSS-ESPA account, manage your imported identifiers and black list, and manage your imported department of corrections files.
OSS-ESPA administrators can view all black list identifiers but a user who has the Global identifiers manager permission can only view black list identifiers that they have added.
There are four tabs on this screen:
-
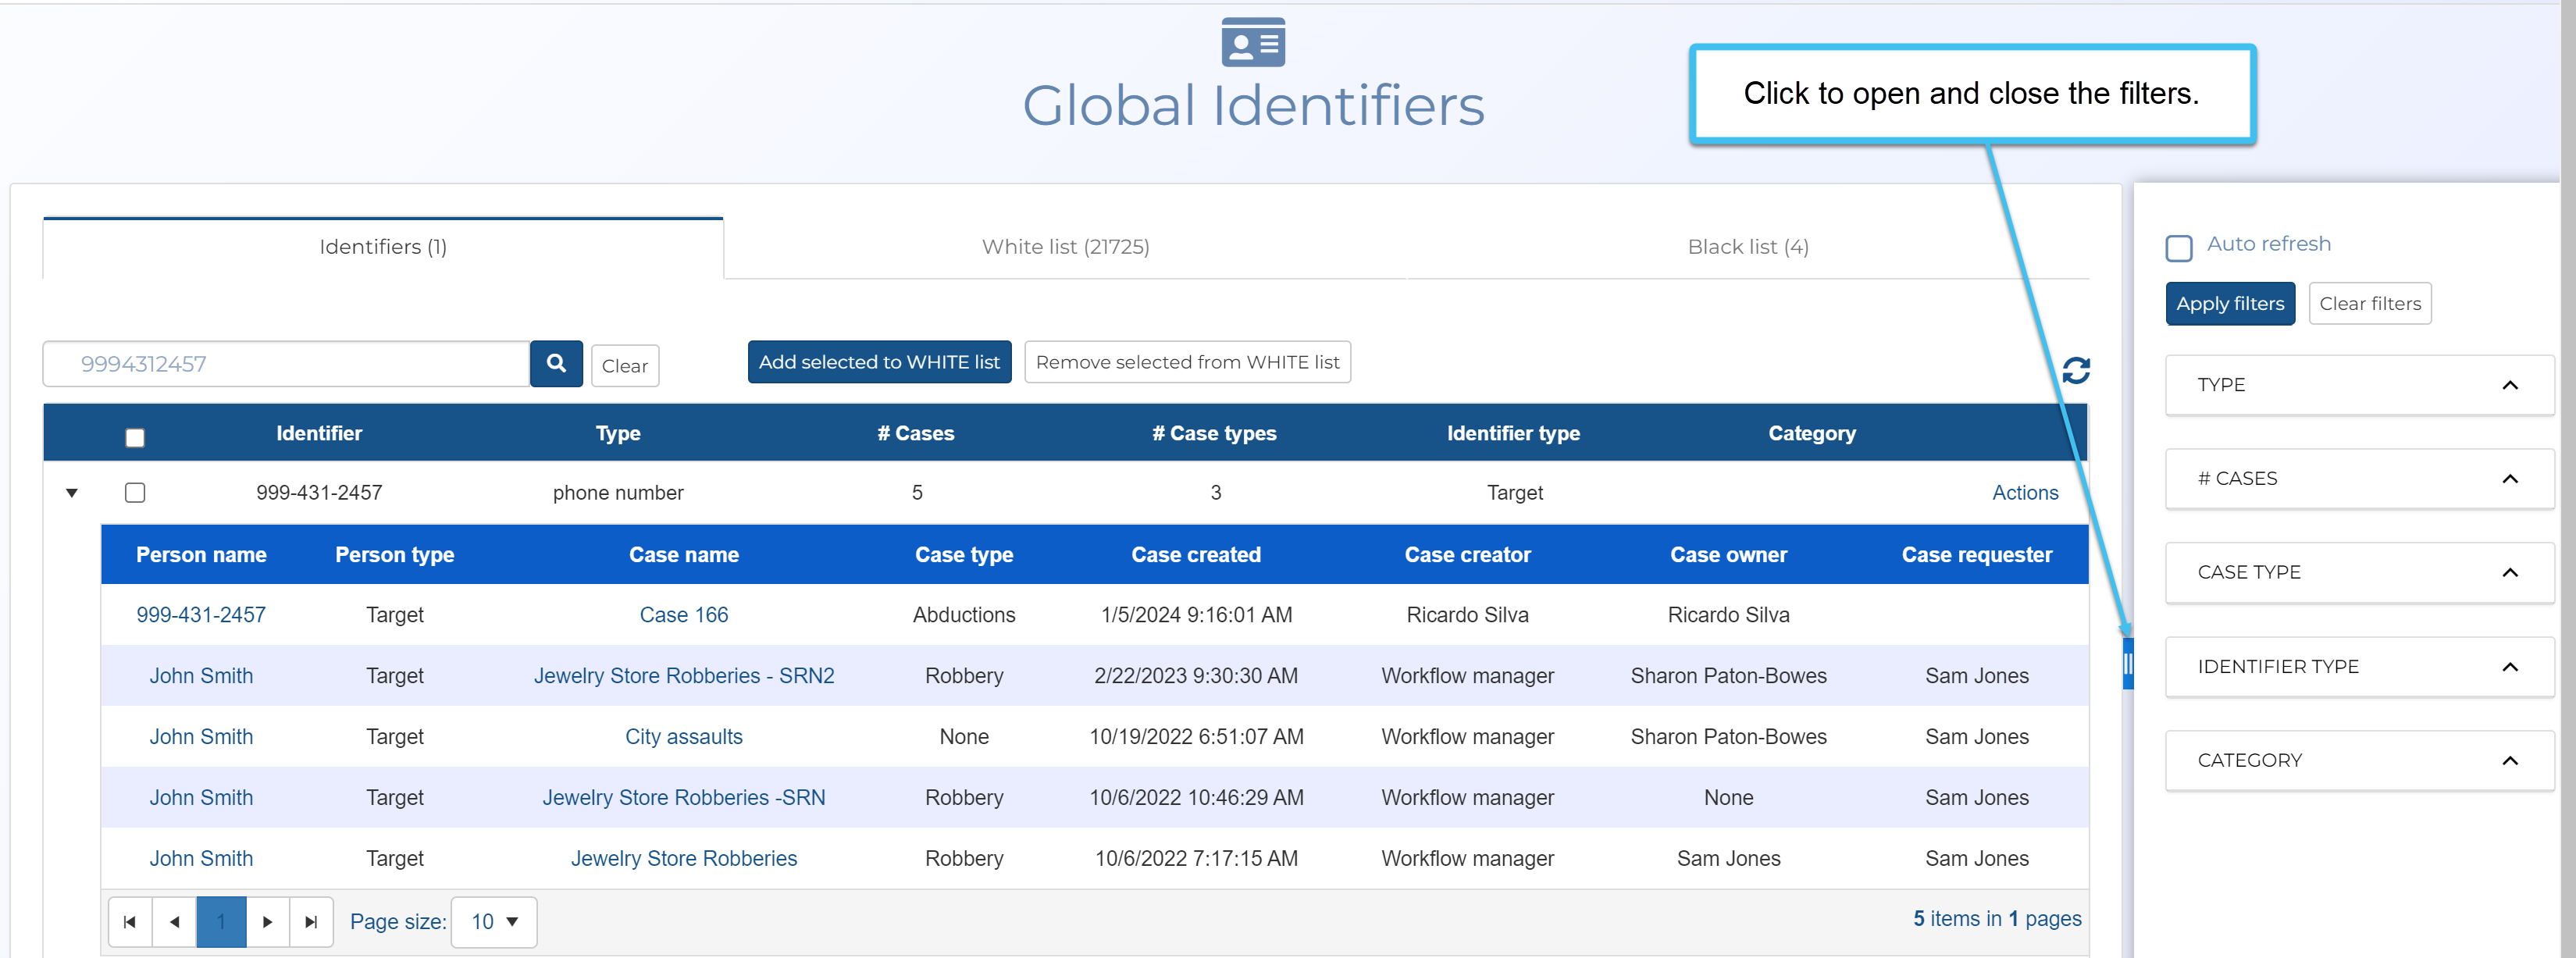
Case identifiers: this tab lists all the identifiers, such as phone numbers within your OSS-ESPA account that have Enable deconfliction (X-Case data search) selected. The table displays: the identifier, the type of identifier, the number of cases it is in, the case types, whether the identifier is a target or an associate, and if it is listed on the white or black list. Click the arrow at the start of the identifier's row to display all the cases the identifier was in, either as a target or as an associate, along with additional details such as the person name and case type. You can also click the person's name to display all their details, and click the case name to open the case.
-
Imported identifiers: this tab allows you to add and manage imported identifiers.
The identifiers you import are typically gathered by multiple other intelligence sources such as case and record management, white lists and the phone book. The imported identifier's associated data is then included in OSS-ESPA, and in the case of white list identifiers it is also included in OSS-SRN Express Portal's X-Case queries and the G-Scout App's X-Case deconflictions. This can provide you with useful leads to follow up on, for example a hotel phone number could indicate where a person is currently sleeping, or an airline number could provide the details of a booked flight. The names on the imported identifiers are used to identify the phone numbers throughout OSS-ESPA, such as on the ESPA analysis center screen, Sentinel screen, Case Management and IQ packets. CLEAR and Whooster public record requests do not request data for white list numbers.
You can also add case identifiers to this tab, by setting the type/category using the Manage global type/category dialog box, so that so that the identifier's details become available throughout OSS-ESPA.
 Other examples of white list identifiers are:
-
SMS short codes
-
Service provider routing numbers
-
Service providers voicemail numbers
-
Rental car companies
-
Local hotels and motels
-
Storage facilities
-
Correctional facilities
-
Probation/Parole officers
-
Schools Insurance companies
-
Government services
-
Courts
-
-
Imported DoC: this tab lists all the department of corrections (DoC) offenders' associates. You can click on an associate number to view the offenders they are in contact with. If the associate appears in an OSS-ESPA case file, then this displays in the Associate info column, where you can click
 to view and edit the associate's information, or click
  to view the x-case history which details the cases, case date, and case target.
 -
Black list: this tab allows you to add and manage black list identifiers.
A black list identifier is one that you want to receive email notification for if any other OSS-ESPA or OSS-SRN Express Portal user adds the identifier to a case. No other user, other than your administrator, is aware of any identifiers you add to your black list, and any associated data you add to a black list identifier is never shared with any other user, for example it is not included in the OSS-SRN Express Portal's X-Case query, or used for PRTT and T3 monitoring. If a new case is created which includes a black list identifier then the case creator is not informed that the identifier is on the black list but if the identifier appears in other cases then the X-Case query includes the data from those cases. For example you could include a phone of a Confidential Informant on the black list.
Adding an identifier to a black list requires higher approval, therefore you must contact your administrator so that they can approve any addition you make. Once approved, you will then receive email notification if any other user adds the identifier to a case.
OSS-ESPA logs all additions, approvals, updates and deletions of black list identifiers, as well as logging all cases that include the identifier both as a target or an associate.
You can open filters to the right of the screen's Case identifiers and Imported identifiers tabs. For example, the Case identifiers tab allows you to apply a combination of filters based on the type of identifier, number of cases, case type, identifier type, and white/black list category.
If you require information on using Global identifiers refer to Using Global identifiers.
You can use the search field to search for either full or partial words and numbers. The search can be performed using letters, numbers, and also - and (). This search field searches for results in the Identifier and Category columns.
Click to clear the search field and update the results displayed on the tab.
This feature is only available to administrators, or users who have the Global identifiers manager permission selected on the Edit user screen.
With one or more identifier check-box selected, click to open the Manage global type/category dialog box which allows you to set the type and category of the identifier. This adds the identifier to the Imported identifiers tab so that the identifier's details become available throughout OSS-ESPA.
This button is useful if you have multiple identifiers you want to manage at one time. Alternatively, if you only have one identifier to manage you can also use the Actions menu.

While this screen is open, if you create a new identifier it does not automatically display on this tab. To display new identifiers you must click this icon.
This feature is only available to administrators, or users who have the Global identifiers manager permission selected on the Edit user screen.
Click to add or remove the selected identifier to or from the white and black lists. The available actions are context sensitive.
Use the search field to search for specific words and numbers. This search field searches for results in the following columns: Identifier, Entry user, Category, Name, Department, Address, Zip code, City and State.
Click to clear the search field and update the results displayed on the tab.

This feature is only available to administrators, or users who have the Global identifiers manager permission selected on the Edit user screen.
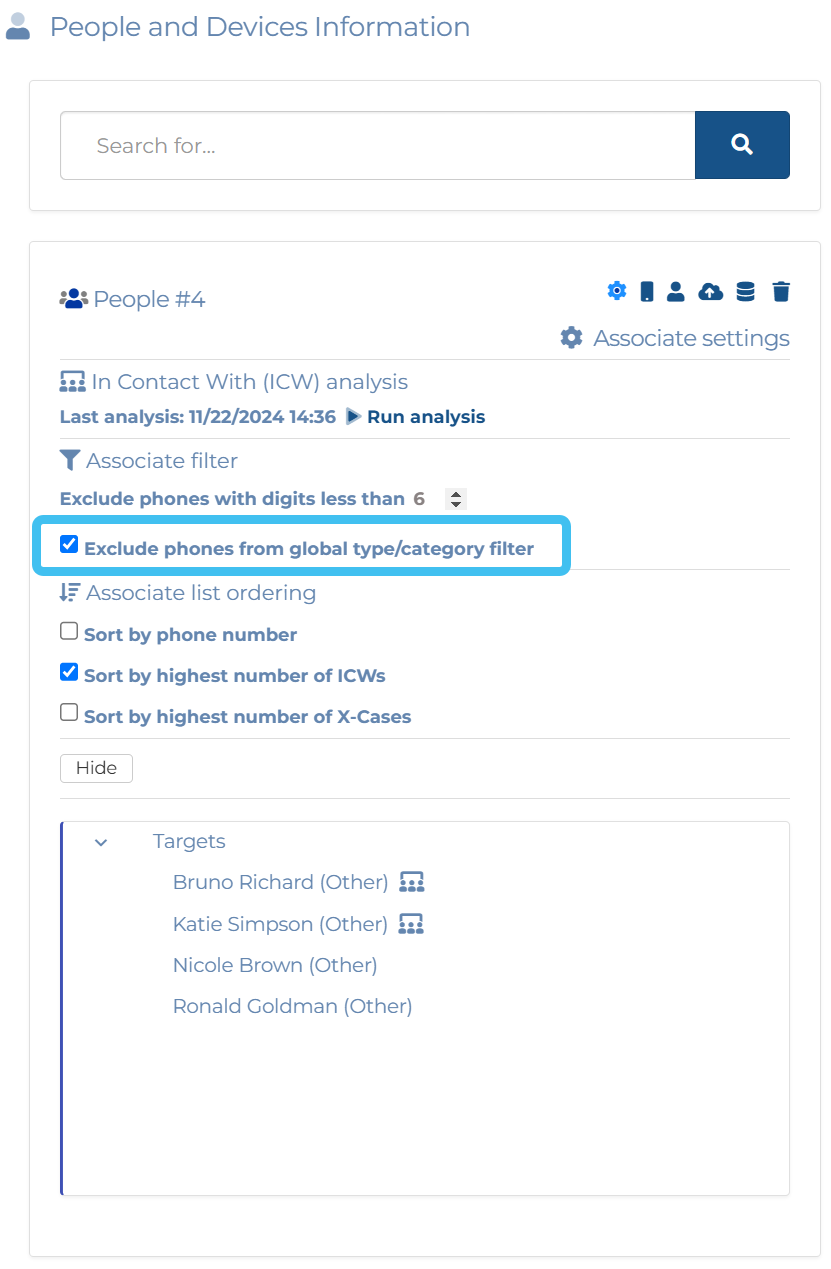
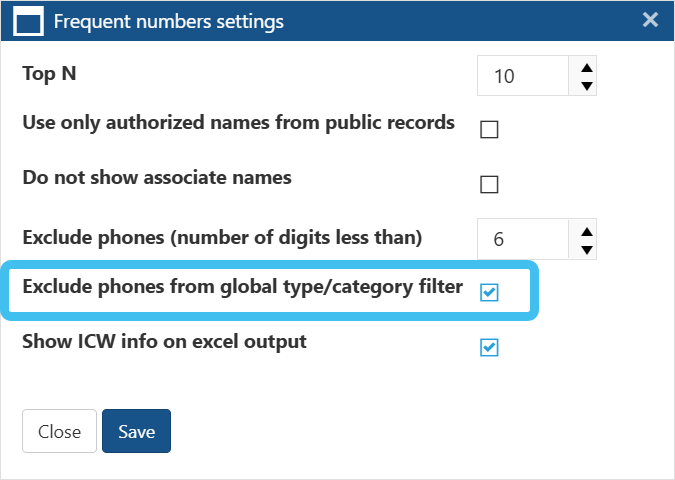
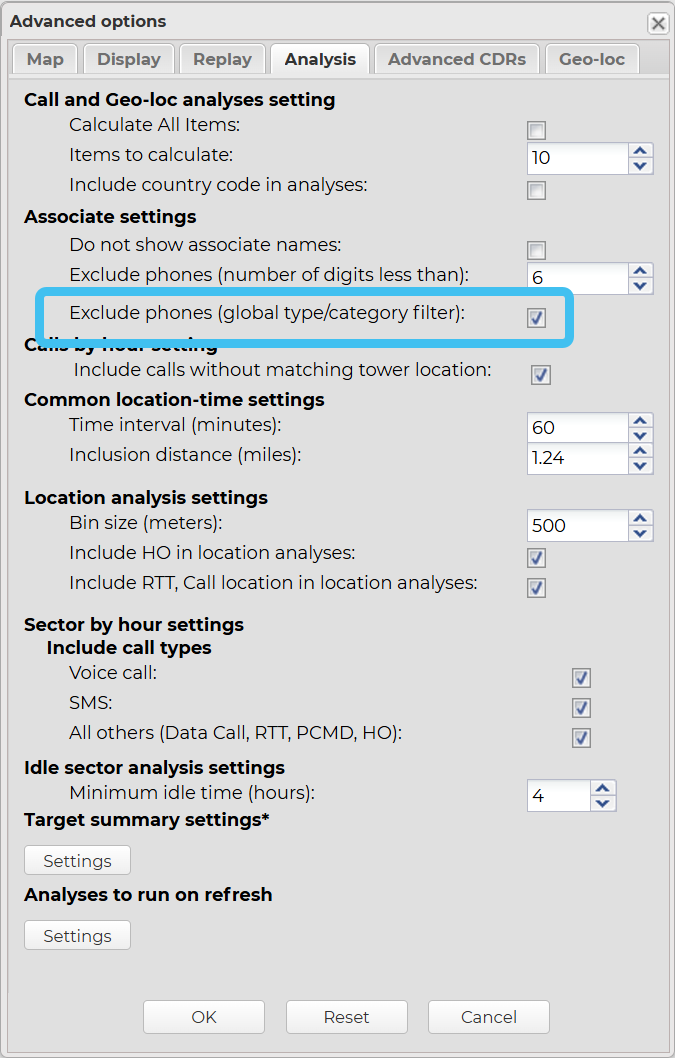
Click to open the Analysis settings dialog box which allows you to manage which types and categories of global identifiers are used in the analyses. Once you have set this, users can choose whether or not to apply this selection to their analyses on the ESPA analysis center, IQ packets and the ICW (in contact with) analysis as shown in the following graphics.
-
On the People and devices information tab of the People and devices screen.
-
On the IQ packet's Frequent number settings dialog box.
-
On the People and devices analysis of the People and devices screen.

-
On the ESPA analysis center's Advanced options dialog box.

This feature is only available to administrators, or users who have the Global identifiers manager permission selected on the Edit user screen.
Click to open the Global identifiers upload screen which allows you to upload an existing .xlsx or .csv identifier file. For the file to be of most benefit it must include: identifier, type, category, name, department, street, zip code, city and state.

This feature is only available to administrators, or users who have the Global identifiers manager permission selected on the Edit user screen.
Click to export the imported identifiers list to a file. If you have a search applied to the list, only the imported identifiers matching your search are exported.

This feature is only available to administrators, or users who have the Global identifiers manager permission selected on the Edit user screen.
Click to add an identifier. The Add/Edit identifier dialog box dialog box opens.

This feature is only available to administrators, or users who have the Global identifiers manager permission selected on the Edit user screen.
Click to edit the selected imported identifier. The Add/Edit identifier dialog box dialog box opens.

This feature is only available to administrators, or users who have the Global identifiers manager permission selected on the Edit user screen.
Click to remove the selected imported identifier from the list.
This feature is only available to administrators, or users who have the Global identifiers manager permission selected on the Edit user screen.
Click to remove any imported identifiers that have their check-box selected from the list. This is useful if you have multiple imported identifiers you want to remove at one time. Alternatively, if you only have one imported identifier to remove you can also use the Actions menu.
If all the imported identifiers you want to remove came from one uploaded file you can also use the Global identifiers upload screen to delete the file which will also remove all the file's identifiers.
While this screen is open, if you have deleted an imported identifier file on a separate tab then this tab is not automatically updated. To display the current imported identifiers you must click this icon.
Use the search field to search for specific words and numbers. This search field searches for results in the Associate number column.
Click to clear the search field and update the results displayed on the tab.
Click to run the X-Case analysis. If an analysis has been previously run then the date and time of it is displayed so that you can determine whether or not you want to rerun it to include new data that may have been added to your case or any other cases in your OSS-ESPA account. The analysis is run in the background and you can continue to use the Imported DoC tab's results which are based on the previous analysis until the new one is complete.
This feature is only available to administrators, or users who have the Global identifiers manager permission selected on the Edit user screen.
Click to open the DoC upload screen which allows you to upload an existing .xlsx or .csv DoC file. For the file to be of most benefit it must include: associate number, offender ID, location name, start date/time, notes, offender name, location address, duration, public phone type, public phone number, state and event type.
While this screen is open, if you have deleted a DoC file on the Doc Upload screen then this tab is not automatically updated. To display the current imported DoC data you must click this icon.
This tab is only available to administrators, or users who have the Global identifiers manager permission selected on the Edit user screen.
Use the search field to search for specific words and numbers. This search field searches for results in the following columns: Identifier, Entry user, Admin approval, Category, First name, Last name, Business name, Address, Zip code, City and State.
Click to clear the search field and update the results displayed on the tab.
Click to add an identifier to the black list. TheAdd/Edit black list dialog box dialog box opens.
Click to edit the selected identifier. The Add/Edit black list dialog box dialog box opens.
Click to remove the selected identifier from the black list.

Click to view a log that details the time and person that added, approved and updated the identifier.


This icon is only displayed if the identifier has not yet been approved by the administrator. Click to approve the identifier as suitable to be added to the black list.
Adding an identifier to a black list requires higher approval, therefore a user must contact their administrator so that they can approve any addition a user makes. Once approved, the user who requested the addition will then receive email notification if any other user adds the identifier to a case.
Click to remove any identifiers that have their check-box selected from the black list. This is useful if you have multiple identifiers you want to remove at one time.